Black Velvet Cake: The Secret Behind Its Stunning Dark Hue
The moment a slice of black velvet cake is presented, it's impossible not to be captivated. Its dramatic, almost inky hue stands in striking contrast to a snowy white frosting, promising a dessert that is as visually stunning as it is delicious. This show-stopping quality makes it a favorite for holidays like Halloween, yet its sophisticated flavor profile means it graces tables year-round. But what exactly is the secret behind its distinctive dark color and its renowned velvety texture? It’s a fascinating tale of clever ingredient choice and meticulous technique that elevates this cake far beyond a mere chocolate treat.
Unlike many vibrant cakes that rely on generous amounts of food coloring, the black velvet cake achieves its deep, rich darkness through a natural, yet specially processed, ingredient. This isn't just about aesthetics; it's about crafting a harmonious balance of flavor and texture that makes every bite truly unforgettable.
The Enigma of the Dark Hue: Beyond Food Coloring
When you encounter a dessert with such an intense color, the immediate assumption is often artificial food coloring. However, the true beauty of black velvet cake lies in its natural foundation. The secret weapon in its arsenal is black cocoa powder. This isn't your everyday cocoa; it's a specially treated variety that undergoes an "ultra-Dutch processed" treatment.
What does "Dutch processing" entail? It's a method where cocoa beans are washed in an alkaline solution, typically potassium carbonate, which neutralizes their acidity. While standard Dutch-processed cocoa is darker and milder than natural cocoa, *ultra-Dutch processed* black cocoa takes this a step further. The extensive processing significantly reduces the cocoa's acidity, resulting in a profoundly darker color – often described as akin to crushed charcoal – and a flavor profile that is smoother, milder, and more mellow than any other cocoa. Think of the deep, almost black color and mild chocolatey taste found in your favorite Oreo cookies; that's the magic of black cocoa at play.
This absence of bitterness, coupled with its intense pigmentation, allows the black velvet cake to achieve its iconic dark hue without the need for artificial dyes, delivering a purer, more rounded chocolate experience. It's a testament to how an understanding of ingredients can transform a simple cake into a culinary masterpiece.
Crafting the Velvety Texture: The Role of Cream Cheese and Technique
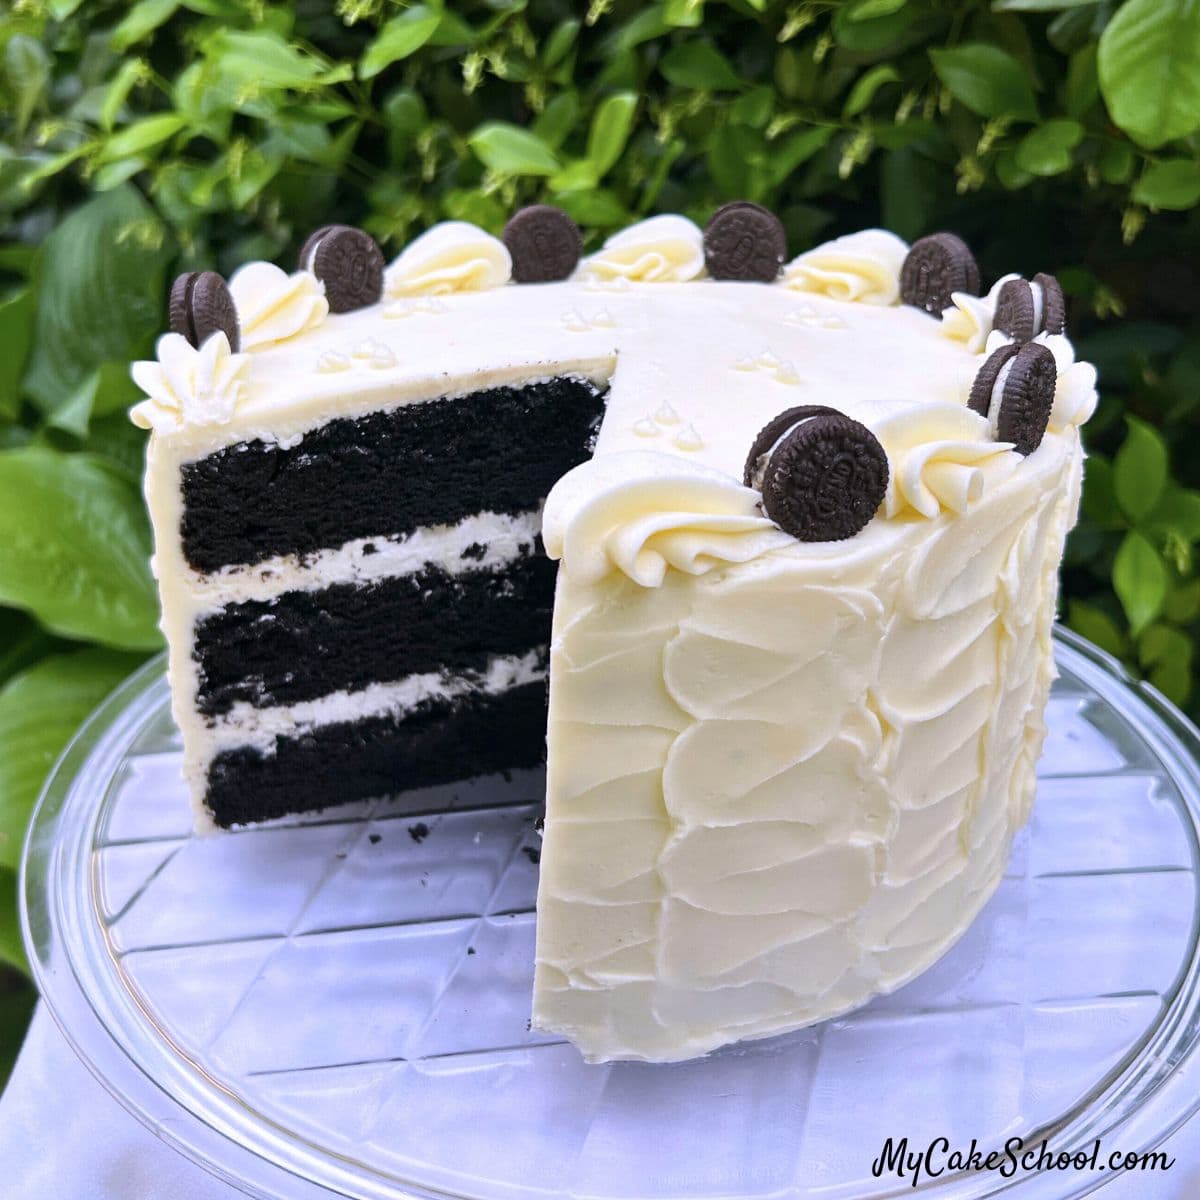
The "velvet" in black velvet cake isn't just a poetic descriptor for its appearance; it speaks directly to its sublime texture. This cake boasts an incredibly fine crumb and a sensationally soft, moist quality that melts in your mouth. While many factors contribute to this, one of the most remarkable is the inclusion of softened cream cheese directly into the cake batter.
Cream cheese, often reserved for frosting, plays a pivotal role here. When incorporated into the batter, it infuses the cake with a unique richness and an unparalleled tenderness. It adds a subtle tang that complements the mellow chocolate flavor of the black cocoa and contributes significantly to the cake's exceptional moisture content. This technique is also employed in other "velvet" cakes, such as white velvet or vanilla velvet, proving its effectiveness in achieving that signature pillowy softness. For more on this, check out our guide on Unlock the Velvety Softness of Black Velvet Cake with Cream Cheese.
Beyond the star ingredient, meticulous baking techniques are crucial for perfecting the velvety texture:
- Creaming Butter and Sugar: Properly creaming softened butter and sugar together until light and fluffy incorporates air, which is vital for a tender cake structure. The addition of softened cream cheese at this stage enhances the richness and contributes to that delicate crumb.
- Egg Incorporation: Adding eggs one at a time ensures they are fully emulsified, creating a stable batter that holds moisture well.
- Alternating Wet and Dry Ingredients: This classic method helps distribute ingredients evenly and prevents overmixing. Starting and ending with the flour mixture helps build structure, while alternating with the milk mixture keeps the batter moist and tender.
- The Hot Coffee Factor: A final pour of hot coffee (or instant espresso dissolved in hot water) does more than just deepen the chocolate flavor. The hot liquid "blooms" the cocoa powder, intensifying its taste, and helps create a smooth, homogenous batter. It's crucial to mix just until incorporated—around 15 seconds—to avoid developing too much gluten, which can lead to a tough cake.
Each step is a dance between ingredients and technique, all working in harmony to create the truly remarkable velvet texture.
Mastering the Baking Process: A Step-by-Step Guide for Perfection
Creating a perfect black velvet cake involves precision and attention to detail. Here’s a streamlined approach, incorporating best practices for an impeccable result:
1. Preparation is Key:
- Preheat Oven: Set your oven to 350°F (175°C). Consistent oven temperature is crucial for even baking.
- Prepare Pans: Grease and flour three 8-inch round cake pans (or two 9-inch pans). For easy release and perfect layers, consider lining the bottoms with parchment paper circles. This extra step is a baker's secret for flawless cakes.
2. Segregate Ingredients for Efficiency:
- Dry Mixture: In a medium bowl, whisk together all-purpose flour, baking powder, baking soda, salt, and the star ingredient, black cocoa powder. Whisking for at least 20 seconds ensures even distribution of leavening agents and cocoa.
- Wet Mixture: In a separate bowl, combine milk, vegetable oil, and vanilla extract. Set aside.
3. The Heart of the Batter: Creaming and Eggs:
- Using an electric mixer with a paddle attachment, beat the softened unsalted butter and softened cream cheese until the mixture is smooth and uniform.
- Gradually add the granulated sugar, mixing on medium speed for a full 3 minutes. This step is critical; it incorporates air, creating a light, fluffy base that contributes to the cake's tender crumb. Remember to scrape down the sides and bottom of the bowl periodically to ensure everything is well combined.
- Add the eggs one at a time, mixing on low to medium speed after each addition until the yolk is fully blended into the batter. This prevents curdling and ensures a smooth emulsion.
4. Bringing It All Together:
- Alternating Additions: With the mixer on low speed, alternately add the dry flour mixture and the wet milk mixture to the creamed butter/sugar/egg mixture. Begin and end with the flour mixture. Typically, this involves three additions of flour alternating with two additions of milk. This method helps maintain a balanced consistency and prevents gluten from over-developing.
- The Hot Coffee Finish: After the last addition of flour mixture, mix until just almost blended. Then, slowly pour in the prepared hot coffee (or instant espresso dissolved in hot water). Mix *just* until incorporated, which usually takes about 15 seconds. Overmixing at this stage can lead to a dense, tough cake. The hot coffee intensifies the cocoa flavor and ensures a smooth, luscious batter.
5. Baking and Cooling:
- Divide the batter evenly among your prepared pans.
- Bake for 25-30 minutes, or until a wooden skewer inserted into the center comes out clean. Our cakes often finish around the 27-minute mark.
- Allow the cakes to cool in their pans on a wire rack for 5 to 10 minutes. This helps them firm up slightly before you attempt to turn them out.
- After this initial cooling, invert the cakes onto the wire rack to cool completely. Ensuring the cakes are fully cool before frosting is essential to prevent the frosting from melting.
Elevating Your Black Velvet Cake: Frostings and Fillings
While the black velvet cake layers are showstoppers on their own, the choice of frosting and filling can elevate it to new heights. The versatility of this cake means it pairs wonderfully with a myriad of flavors and textures.
For a truly dramatic effect, especially fitting for a Halloween centerpiece, a rich black cocoa buttercream can be used for both filling and frosting, intensifying the dark theme. However, many prefer a contrast that highlights the cake's deep hue.
Popular choices include:
- Oreo and Cream Filling with Vanilla Buttercream: This delightful combination offers a textural contrast with crushed Oreos nestled in a creamy filling, all encased in a smooth vanilla buttercream. The vanilla acts as a bright counterpoint to the cake's deep chocolate notes.
- Sweetened Whipped Cream and Crushed Oreos: For a lighter, airier option, layers of sweetened whipped cream studded with crunchy Oreos provide a luxurious mouthfeel that perfectly complements the velvety cake layers.
- Classic Cream Cheese Frosting: Given the cream cheese in the batter, a traditional cream cheese frosting is a natural and beloved pairing. Its slight tanginess beautifully cuts through the richness of the chocolate.
- Berry Fillings: Consider vibrant fruit fillings like raspberry or cherry compote. The tartness and bright color offer a wonderful contrast to the mellow, dark chocolate.
When assembling your layered cake, remember to pipe a dam of your chosen buttercream around the top edge of each cake layer before filling it. This creates a barrier that holds the filling securely in place, preventing it from oozing out and ensuring clean, beautiful slices every time.
Conclusion
The black velvet cake is far more than just a visually striking dessert. It's a testament to the transformative power of understanding ingredients and mastering technique. From its deep, alluring color, achieved naturally through ultra-Dutch processed black cocoa powder, to its exquisite velvety texture, born from the clever inclusion of cream cheese and precise baking steps, every element contributes to its unique charm. Whether you're aiming for a show-stopping Halloween treat or simply craving an exceptionally moist and flavorful chocolate cake, the black velvet cake promises a sophisticated and satisfying experience that truly earns its name. Embrace the dark side of baking, and prepare to impress with this truly magnificent creation.
